Well I have to say I'm in LOVE with making dresses this month! Between my Tutu business, Photography, child care, my own children, and renovations around the house I've been a very busy gal!
I did this up a week ago, and my daughter finally took it for a test run today at school! She loved it ;) It's a bit long for a 'play' dress so my next one I won't make a lengthy.
I followed this: Summer Dress Tutorial to a T. No adjustments needed on this one! Although I will add I did end up making a purple version of this dress which I DID edit... But that was because it was for a different girl and her shoulders needed more support than a spaghetti strap. I may post that one up sooner rather than later.
Until then keep it crafty ;)
Friday, April 20, 2012
Saturday, April 7, 2012
Easter Dresses
So this year I was determined to make Easter Dresses for my daughters. I searched for a few weeks before falling in love with a tutorial.
Butterfly Dress and Headband
Now although I love the dress, I had a really hard time with the tutorial. It's very well written and the pics are awesome but with no messurements I had a bit of a difficult time.
To get through that I grabbed two old dresses of my daughters and used them as a template. I added a few inches on the width of them so I had enough for the gathering parts.
You'll see in my dresses below that I did not follow the tutorial to a T. I added my own little touches to make the dresses a little more dressy.
Dress 1 is more of a 4/5T while Dress 2 is more of a 12-24months. I am super happy with how these turns out. If anyone wants me to show how to make the extra touches to the original tutorial please let me know and I'll post up my version of the tutorial. :)
Butterfly Dress and Headband
Now although I love the dress, I had a really hard time with the tutorial. It's very well written and the pics are awesome but with no messurements I had a bit of a difficult time.
To get through that I grabbed two old dresses of my daughters and used them as a template. I added a few inches on the width of them so I had enough for the gathering parts.
You'll see in my dresses below that I did not follow the tutorial to a T. I added my own little touches to make the dresses a little more dressy.
![]() |
| Front of Dress1 |
![]() |
| Back of Dress1 |
![]() |
| Front of Dress2 |
![]() |
| Back of Dress2 |
Dress 1 is more of a 4/5T while Dress 2 is more of a 12-24months. I am super happy with how these turns out. If anyone wants me to show how to make the extra touches to the original tutorial please let me know and I'll post up my version of the tutorial. :)
Thursday, April 5, 2012
Breakfast with the Kids!
Want a super easy and yummy breakfast idea? I have to tell you it is NOT quick, so if you're in a hurry stick with a bowl of fruit or cereal!
One of the girls wanted to make breakfast with me the other morning so I thought I'd take a pin from my Pinterest Board - Bacon, Egg, and Toast Cups.
Now for those who hate clicking unknown links... Like myself ;) Here is the links details. I should add that this is NOT my recipe, this is MY version of the recipe linked above.
This Recipe makes 6 Bacon, Egg, and Toast Cups
One of the girls wanted to make breakfast with me the other morning so I thought I'd take a pin from my Pinterest Board - Bacon, Egg, and Toast Cups.
Now for those who hate clicking unknown links... Like myself ;) Here is the links details. I should add that this is NOT my recipe, this is MY version of the recipe linked above.
This Recipe makes 6 Bacon, Egg, and Toast Cups
- 3 tablespoons unsalted butter, melted
- 8 slices white or whole-wheat sandwich bread
- 3 slices bacon
- 4 large eggs
- 1/4 cup of cheese (I used Old Cheddar, but this would be delicious with anything really)
- A splash of milk (I didn't measure I just went by what looked right. Maybe 2tbs?)
- 1 chopped green onion (Optional, you can add other smaller veggies if you'd like)
- Coarse salt and ground pepper
Directions
- Preheat oven to 375 degrees. Lightly butter 6 standard muffin cups. With a rolling pin, flatten bread slices slightly and, with a 4 1/4-inch cookie cutter, cut into 8 rounds. If you don't have a round cookie cutter than use a pizza cutter. Simply cut the crust off in a circle like shape. Cut each round in half, then press 2 halves into each muffin cup, overlapping slightly and making sure bread comes up to edge of cup. Use extra bread to patch any gaps. Brush bread with remaining butter.
- In a large skillet, cook bacon over medium, throw in the onion at this point too. Cook bacon until it's almost crisp, 4 minutes, flipping once. (It will continue to cook in the oven.) While the bacon is cooking combined the eggs, milk, cheese and pepper/salt. Whisk together and set aside for a moment. Take the bacon out and lay 1/2 a piece bacon in each bread cup. Throw the onions into the milk egg mixture and give it a quick whisk. Pour the mixture over the bacon and bread. Bake until egg whites are just set, 20 to 25 minutes. Run a small knife around cups to loosen toasts. Serve immediately.
And that's it! Serve them up right away and dig in! These are so delicious and all seven people in our house were asking for seconds, and thirds!
![]() |
| You may notice there is only Five... Some went missing between the muffin tray to the plate due to "testing" ;) |
Sunday, March 11, 2012
Blah day activity
So the other day was a beautiful day but it was COLD and WINDY. Instead of popping in a movie I decided to get a bit more 'fun'. I've made them bottles of oil and water previously and decided to use the good lighting to our advantage.
All you need is:
* Food Coloring - 2-3 drops work wonderfully
* Plastic Bag - it MUST be able to zip up and be leak proof!
* Cooking Oil - any kind will do... You can even use baby oil if you have it on hand
You combined everything carefully into a bag and then tape them up against the window. As long as you don't have any chewers and the kids know how to play gently you can keep them entertained for a few hours. My girls loved watching the water and oil mix and then settle again. I taped my bags close enough that they could flip the bags up and see the colors change when pressed against each other.
I have to admit I always have loved the oil and water combo. It's been a favourite of mine for years since I was a little girl, and I'm so glad I can pass on it to my little darlings.
All you need is:
* Food Coloring - 2-3 drops work wonderfully
* Plastic Bag - it MUST be able to zip up and be leak proof!
* Cooking Oil - any kind will do... You can even use baby oil if you have it on hand
You combined everything carefully into a bag and then tape them up against the window. As long as you don't have any chewers and the kids know how to play gently you can keep them entertained for a few hours. My girls loved watching the water and oil mix and then settle again. I taped my bags close enough that they could flip the bags up and see the colors change when pressed against each other.
I have to admit I always have loved the oil and water combo. It's been a favourite of mine for years since I was a little girl, and I'm so glad I can pass on it to my little darlings.
Friday, March 9, 2012
Airplane Cockpit
So my darling husband has been busy working on a project for the little one's class. We received a note home stating that the class was studying airplanes and that any donated materials would be greatly appreciated. Now I am a HUGE lover of school projects, functions, and bake sales. I participate as much as I can, whenever I can.
We sent in an old fire fighters dress hat and wrote that my husband would LOVE to help add a few details to the airplane cockpit. Below you will find pictures of the finished project. We did not paint or draw the cockpit, that was all the teachers doing. He added everything else. Everything on that plane was from the dollar store or found around the house/a friend. My husband has a lot of 'trade' friends so spare parts float around a lot.
Anyways, I was so proud of the outcome I had to share it with you all.
That's all for today!
We sent in an old fire fighters dress hat and wrote that my husband would LOVE to help add a few details to the airplane cockpit. Below you will find pictures of the finished project. We did not paint or draw the cockpit, that was all the teachers doing. He added everything else. Everything on that plane was from the dollar store or found around the house/a friend. My husband has a lot of 'trade' friends so spare parts float around a lot.
Anyways, I was so proud of the outcome I had to share it with you all.
![]() |
| The whole cockpit |
![]() |
| These actually move up and down and side to side. |
![]() |
| Button One |
![]() |
| Coils |
![]() |
| Clear blue sky |
![]() |
| Gage |
![]() |
| Lights all lit up |
![]() |
| Switch One |
![]() |
| Switch Two |
![]() |
| Switch Three |
![]() |
| Switch Four |
![]() |
| Close up of Button One Off |
![]() |
| Close up of Button One On |
Sunday, March 4, 2012
Spring Cleaning
March is finally here! It's one of my preferred months! Besides the fact it's my birthday month - it also signifies the beginning of spring and with the mild winter we've had I'm thrilled to get this years planting started!
Sadly I haven't touched my sewing machine in weeks due to renovations and reorganizing the house. So there's nothing new to share in the way of Crafty Clothes, but I still have been busy being frugal.
A while back I found the link to making my own Orange Vinegar cleaner. Basically it consists of orange peels and vinegar, you let it sit for TWO WEEKS - this is key to getting the orange scent to last longer. I put mine in an old jam jar and left it on my stove for a week and a half, then I couldn't wait any longer and broke it out. It smelt MUCH better than regular vinegar and water but I think if I'd held back a few more days I could have gotten a better scent.
Next I enlisted in some help to clean my cupboards and walls. I made up some Dish Soap Foam put it out for the daring daughters and wa-la a morning activity that kept the busy, made my house cleaner and had them playing cooperatively together without a single squabble for hours! It was pure bliss. What more can a mother ask for?
I'm in the midst of picking out a color scheme to my laundry room/master bathroom/walk-in closet, and yes it's all one room, so I'd like it to flow nicely. I think I have it all picked out just need to execute my plan. I'm also repainting my ugly, ugly kitchen and trying to figure out the best way to redo the hideous counter tops. Evidently someone thought it would be a good idea to faux rock finish them without covering the surrounding walls and drawers so they all need to be sanded down as well. Anyways wish me luck because this house is in for a big make over! I'll be busy the next few weeks but it'll be worth it to make my house super pretty! ;)
In the mean time keep it crafty and hopefully next post I'll have a few updates on my reno-projects!
Sadly I haven't touched my sewing machine in weeks due to renovations and reorganizing the house. So there's nothing new to share in the way of Crafty Clothes, but I still have been busy being frugal.
A while back I found the link to making my own Orange Vinegar cleaner. Basically it consists of orange peels and vinegar, you let it sit for TWO WEEKS - this is key to getting the orange scent to last longer. I put mine in an old jam jar and left it on my stove for a week and a half, then I couldn't wait any longer and broke it out. It smelt MUCH better than regular vinegar and water but I think if I'd held back a few more days I could have gotten a better scent.
Next I enlisted in some help to clean my cupboards and walls. I made up some Dish Soap Foam put it out for the daring daughters and wa-la a morning activity that kept the busy, made my house cleaner and had them playing cooperatively together without a single squabble for hours! It was pure bliss. What more can a mother ask for?
I'm in the midst of picking out a color scheme to my laundry room/master bathroom/walk-in closet, and yes it's all one room, so I'd like it to flow nicely. I think I have it all picked out just need to execute my plan. I'm also repainting my ugly, ugly kitchen and trying to figure out the best way to redo the hideous counter tops. Evidently someone thought it would be a good idea to faux rock finish them without covering the surrounding walls and drawers so they all need to be sanded down as well. Anyways wish me luck because this house is in for a big make over! I'll be busy the next few weeks but it'll be worth it to make my house super pretty! ;)
In the mean time keep it crafty and hopefully next post I'll have a few updates on my reno-projects!
Tuesday, February 21, 2012
Super Muffins!
So today I'm posting my 'go to' muffin recipe all year around. I only have two go to muffin recipes. My Monster Zucchini Muffins with Oatmeal and Brown Sugar crumble top, and my Iron-Rich Muffins.
I'd love to share my Zucchini Muffin recipe but it's a family secret ;) So instead I'm sharing my super delicious and moist Iron-Rich Muffin recipe! All seven members of our house hold LOVE this recipe and it can be gone literally in an hour.
The recipe calls for
1/2 cups of rolled oats (Instant works fine)
1 cup of milk (You can used skimmed if you want)
1 cup of flour (Half and half works nicely as well as white or unbleached)
1 cup of baby cereal (Rice or Oats)
1 teaspoon cinnamon
1 teaspoon baking powder
1/2 teaspoon baking soda
1/2 teaspoon salt
1/2 cup vegetable oil
1/2 cup packed brown sugar
1 egg (Omega rich if you'd like)
OPTIONAL
1/2 cup raisins
OR
1/2 cup chopped dried dates
OR
1/2 cup chocolate chips
OR
1/2 cup walnuts
*I've never added the OPTIONAL 1/2 cup of something... I like how they taste without the added flavour.
Step 1. Preheat the Oven to 350F (180C)
Step 2. Line a 12 cup muffin pan, or grease a 9 x 5 inch loaf pan.
Step 3. In a large bowl, mix oats and milk.
Step 4. In a medium bowl, mix flour, baby cereal, cinnamon, baking powder, baking soda, salt (Add optional ingredient now too if desired)
Step 5. Add oil, brown sugar, and egg to oat and milk mixture. Mix well.
Step 6. Gently mix together wet and dry ingredients, until just combined.
Step 7. Pout batter into muffin cups or loaf pan.
Step 8. Muffins should bake for roughly 20 minutes and a loaf pan should bake for roughly 30 minutes. Test with a toothpick.
This recipe is suppose to make only 12 muffins but I can get 12 mini muffins AND 12 regular muffins out of this recipe!
I got this recipe from a book my dietitian gave me called 'The Joy of Life Recipe Booke for Heathy Women and Babies'. I do not own this recipe and do not suggest anyone use this recipe for mass production or profit.
Had to cover my butt there ;) Hope you all enjoy your baking!
I'd love to share my Zucchini Muffin recipe but it's a family secret ;) So instead I'm sharing my super delicious and moist Iron-Rich Muffin recipe! All seven members of our house hold LOVE this recipe and it can be gone literally in an hour.
The recipe calls for
1/2 cups of rolled oats (Instant works fine)
1 cup of milk (You can used skimmed if you want)
1 cup of flour (Half and half works nicely as well as white or unbleached)
1 cup of baby cereal (Rice or Oats)
1 teaspoon cinnamon
1 teaspoon baking powder
1/2 teaspoon baking soda
1/2 teaspoon salt
1/2 cup vegetable oil
1/2 cup packed brown sugar
1 egg (Omega rich if you'd like)
OPTIONAL
1/2 cup raisins
OR
1/2 cup chopped dried dates
OR
1/2 cup chocolate chips
OR
1/2 cup walnuts
*I've never added the OPTIONAL 1/2 cup of something... I like how they taste without the added flavour.
Step 1. Preheat the Oven to 350F (180C)
Step 2. Line a 12 cup muffin pan, or grease a 9 x 5 inch loaf pan.
Step 3. In a large bowl, mix oats and milk.
Step 4. In a medium bowl, mix flour, baby cereal, cinnamon, baking powder, baking soda, salt (Add optional ingredient now too if desired)
Step 5. Add oil, brown sugar, and egg to oat and milk mixture. Mix well.
Step 6. Gently mix together wet and dry ingredients, until just combined.
Step 7. Pout batter into muffin cups or loaf pan.
Step 8. Muffins should bake for roughly 20 minutes and a loaf pan should bake for roughly 30 minutes. Test with a toothpick.
This recipe is suppose to make only 12 muffins but I can get 12 mini muffins AND 12 regular muffins out of this recipe!
I got this recipe from a book my dietitian gave me called 'The Joy of Life Recipe Booke for Heathy Women and Babies'. I do not own this recipe and do not suggest anyone use this recipe for mass production or profit.
Had to cover my butt there ;) Hope you all enjoy your baking!
Friday, February 17, 2012
Lunch Ideas
I recently decided that I was going to start making 'Non-Bento' styled lunches for my little ones. I know my eldest doesn't start school for a while but I figured if I start making them now then I'll know what they will and will not eat and how big of portions to try.
Now a few of you have no idea what Bento is but it's a traditional Japaneese lunch. It's actually REALLY cool and if done properly can be super healthy and super cute at the same time ;). Sadly I'm just starting out so mine are only Bento inspired and not actually Bento. When I get some experience with what I'm working with I'll branch into more traditional Bento. I'm hoping to try egg molding this weekend ;) So I'll keep you posted!
![]() |
| Butterfly and Bumble Bee made from left over homemade MacNCheese, with a pepper flower, snap peas, yellow tomato, carrots, humus , and a few crackers. |
![]() |
| Left over Hot Dogs, crackers, apple, cheese, cherry tomatoes, carrots. and peppers. |
Monday, February 13, 2012
Another Valentines Day Post!
I can hardly contain my excitement!
I searched and SEARCHED for something for my darling little ones for Valentines Day. I found TONS of candy, cheap plushies - which they have TONS of, and more candy...
So I went searching through the net to see what I could come up with. Originally I swore to myself to do something with as little chocolate/candy as possible... But that kinda went out the window when I found Non-Bento Totoro Chocolate.
I don't know about any of you readers but myself and my children are HUGE fans of Hayao Miyazaki. If you are unsure who that is... IMDB.com will give you a list of his work. I recommend (Along with Totoro) Ponyo, Arietty, Spirited Away, and Howls Moving Castle. Those ones I find are good for all ages. :)
Anyways enough about Mr. Miyazaki and how awesome he is ;)
I followed the tutorial to the letter and below are just a few pictures of my work. I also decided to make my litte one a chocolate letter ;)
And that's all for today! Enjoy :D
I searched and SEARCHED for something for my darling little ones for Valentines Day. I found TONS of candy, cheap plushies - which they have TONS of, and more candy...
So I went searching through the net to see what I could come up with. Originally I swore to myself to do something with as little chocolate/candy as possible... But that kinda went out the window when I found Non-Bento Totoro Chocolate.
I don't know about any of you readers but myself and my children are HUGE fans of Hayao Miyazaki. If you are unsure who that is... IMDB.com will give you a list of his work. I recommend (Along with Totoro) Ponyo, Arietty, Spirited Away, and Howls Moving Castle. Those ones I find are good for all ages. :)
Anyways enough about Mr. Miyazaki and how awesome he is ;)
I followed the tutorial to the letter and below are just a few pictures of my work. I also decided to make my litte one a chocolate letter ;)
And that's all for today! Enjoy :D
Tuesday, February 7, 2012
PJs!
I made PJs! I didn't even use a pattern! I'm so excited about this project! It was my first project using stabilizer too without 'adult super vision'. ;) Seriously though... I was kinda nervous about that. My mother-in-law was thankfully just a phone call away and walked me through the gathering part of this idea of mine. My Husqvarna is so alien to me sometimes... Lol it never fails though and I'm also insanely happy with the end results with it!
Anyways!
Onto the project!
Basically I took a pair of existing PJ bottoms for reference.
Now I'll admit it... I got carried away and didn't photograph anything else of this little project... But here's what it looks like finished! YAY!
I'm planning on making a few more pairs of PJs so I'll do another post another time with more in-depth details. :) Although I'm not doing the fancy trim on the legs any time soon... That was a fun learning experience but I've learned it's a lot of work for PJ pants ;)
Anyways!
Onto the project!
Basically I took a pair of existing PJ bottoms for reference.
Now I'll admit it... I got carried away and didn't photograph anything else of this little project... But here's what it looks like finished! YAY!
I'm planning on making a few more pairs of PJs so I'll do another post another time with more in-depth details. :) Although I'm not doing the fancy trim on the legs any time soon... That was a fun learning experience but I've learned it's a lot of work for PJ pants ;)
Saturday, February 4, 2012
Valentines Day!
I can't express how happy I am that V-day is upon us! I usually don't buy into the commercialism of it all but with my eldest in pre-school and showing a big interest in giving out valentines I found myself googling and Pinteresting and becoming hooked! I didn't want to give anything sugary so I went to creative route ;)
I found these beautiful crafts and of course we did our own versions of them ;)
We did some of these Handprint Valentines - Honestly they look really cute but for kids that are just learning to write it was a bit of a chore... lol
Next we tried these cute crayons out! Heart Crayon We emptied our crayon bucket and took all the odd end ones, we also raided my in-laws crayon bucket and stole their broken ones too. The kids LOVED them. A word of advice, use a razor. Cut one line down the paper jacket, let the kids peel and break the crayons. This whole process takes like a minute or two. If you do it 'the old fashion way', you'll be peeling for five minutes and having children whining about how long it's taking and a lot of 'Are you done yet?'.
Darling Daughter can't sign her name yet so she signed her valentines with two thumb prints to make a heart.
This is our handprint hearts before writing around the hearts. With the writing you can't tell what they are saying and the words go all over the page... lol
An that's what we've been up to for V-day! ;)
I found these beautiful crafts and of course we did our own versions of them ;)
We did some of these Handprint Valentines - Honestly they look really cute but for kids that are just learning to write it was a bit of a chore... lol
Next we tried these cute crayons out! Heart Crayon We emptied our crayon bucket and took all the odd end ones, we also raided my in-laws crayon bucket and stole their broken ones too. The kids LOVED them. A word of advice, use a razor. Cut one line down the paper jacket, let the kids peel and break the crayons. This whole process takes like a minute or two. If you do it 'the old fashion way', you'll be peeling for five minutes and having children whining about how long it's taking and a lot of 'Are you done yet?'.
Darling Daughter can't sign her name yet so she signed her valentines with two thumb prints to make a heart.
![]() |
| Valentines 'Package' |
![]() |
| A small v-day card, some goldfish, a crayon heart and some stickers :) |
An that's what we've been up to for V-day! ;)
Monday, January 30, 2012
Reversible Apron Tutorial.
So I had to make two special little girls Aprons to help me bake in the kitchen. They are both pretty baking obsessed so I figured they'd enjoy their own little Apron and Oven Mitt.
I liked two different Tutorials Mini Me Apron Set and Childs Apron, but ultimately took pieces from both, combined them, and made my own. ;)
The Mini Me Apron Set tutorial is 100% free. No fee at all but a lot of work due to the bias tape...
The Childs Apron is not free... You have to pay some sort of membership fee to download the pattern but if you can make your own pattern the Tutorial aspect of the page is just fine. It's a VERY simple pattern/apron.
And below is MY version ;)
I used the Mini Me Apron Set pattern to start off with.
What you need
1/2 yard of Side A
1/2 yard of side B
2 yards of ribbon
1/4 yard of towel material
Other basic sewing accessories
Place one A and one B right sides together and sew together leaving an 1.5'' opening at the top of the two pieces. Use a 1/4'' seam allowance at the top but for the curve you can switch to 1/8''.
Turn the pieces right side out and iron the opening to fold inward like the picture above.
You then tuck everything in and pin it Sides A and B together with right sides facing in and wrong sides facing out. Sew leaving an 1/4 seam allowance. Make sure that your ribbon is straight when you sew over it. It can become crocked if not checked.
Cut the mittens out. Place the right sides together like the picture above and sew leaving a 1/4'' allowance.
Clip around the curved part of the mitten and the fingers. Turn the mitten right side out. Stick the towel mitten inside the outer shell. Fold the rough edges inwards twice... then iron. I only folded ONCE... As you'll see in the picture below it leaves an unsightly mess to do it my way so I suggest folding twice. Sew using an 1/4'' to 1/2'' seam allowance depending on how much you folded inwards.
And that's my version of a Reversible Apron Tutorial + Oven Mit. :)
I liked two different Tutorials Mini Me Apron Set and Childs Apron, but ultimately took pieces from both, combined them, and made my own. ;)
The Mini Me Apron Set tutorial is 100% free. No fee at all but a lot of work due to the bias tape...
The Childs Apron is not free... You have to pay some sort of membership fee to download the pattern but if you can make your own pattern the Tutorial aspect of the page is just fine. It's a VERY simple pattern/apron.
And below is MY version ;)
I used the Mini Me Apron Set pattern to start off with.
What you need
1/2 yard of Side A
1/2 yard of side B
2 yards of ribbon
1/4 yard of towel material
Other basic sewing accessories
| Side A |
| Side B |
| Pockets A and B |
Turn the pieces right side out and iron the opening to fold inward like the picture above.
Sew to top closed. Then pin one pocket with reserve side out. You'll see in the picture above I put the Pocket B side up and the Pocket A side inwards to match and Apron A piece. Sew the pocket in place following the curve using a 1/8'' seam allowance, increase to 1/4'' if desired. Repeat on Apron B piece with Pocket A side up.
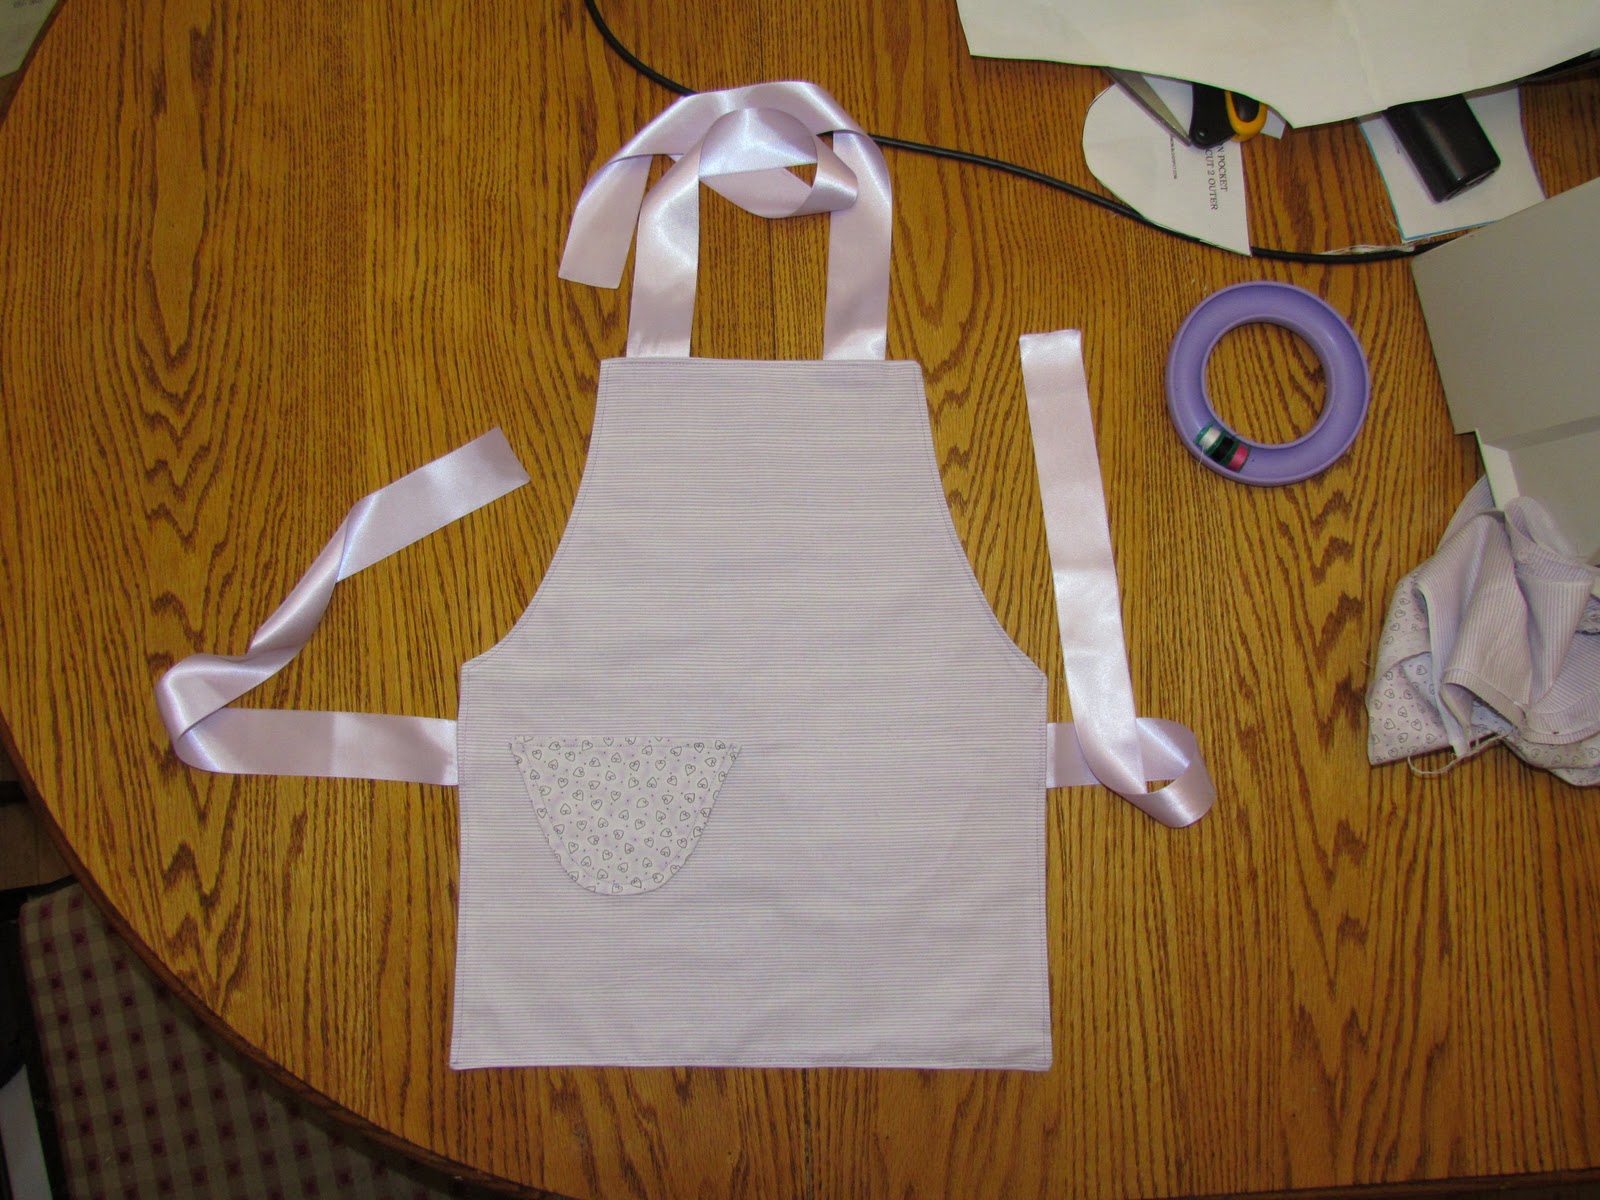
Next comes the 'ties' I heat sealed my ribbon ends to prevent fraying. I then pinned the ribbon on to the wrong side of the apron. You'll see above that I places the ribbon 1.5'' from the arm curve.
I used a few 'tacking stitches' about 1/8'' away from the aprons edge. I did this to all four pieces of ribbon. Two for the sides and two for the neck. The neck ribbons were place roughly 1'' from the sides.You then tuck everything in and pin it Sides A and B together with right sides facing in and wrong sides facing out. Sew leaving an 1/4 seam allowance. Make sure that your ribbon is straight when you sew over it. It can become crocked if not checked.
| Side A finished |
| Side B finished |
| Side A finished |
| Side B finished |
Cut the mittens out. Place the right sides together like the picture above and sew leaving a 1/4'' allowance.
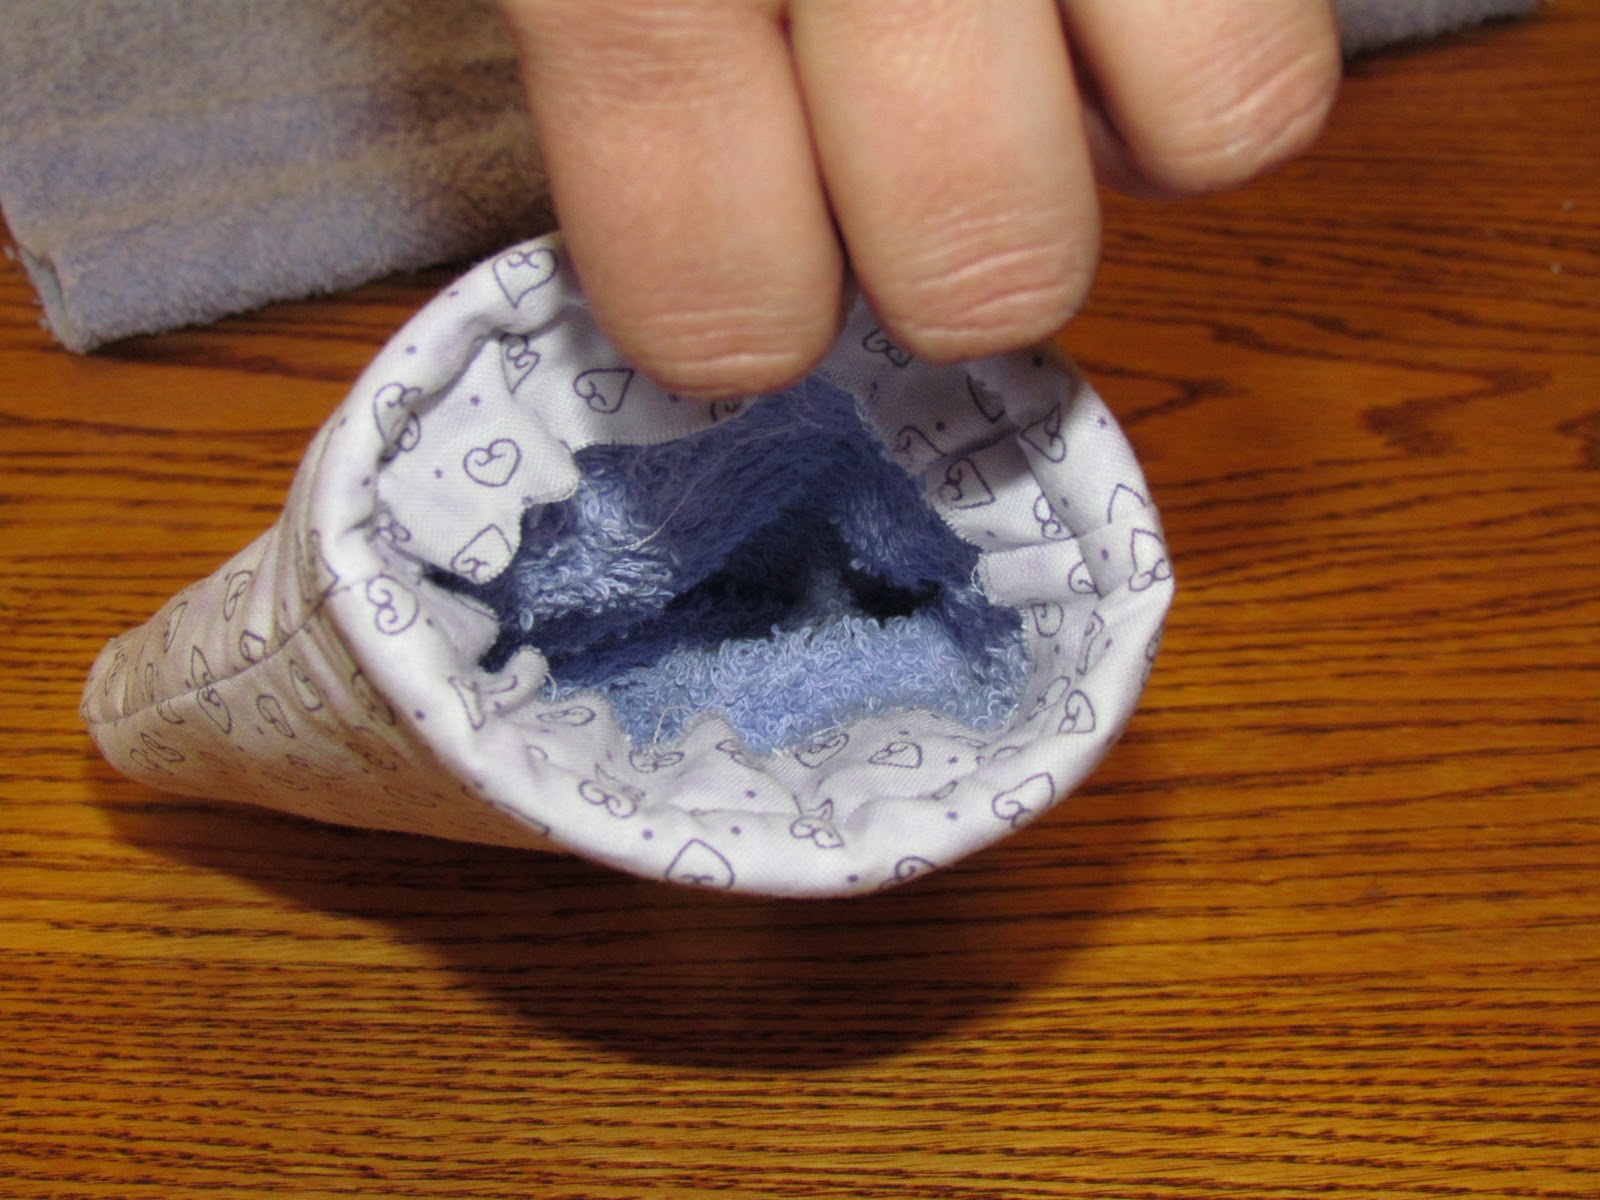
Clip around the curved part of the mitten and the fingers. Turn the mitten right side out. Stick the towel mitten inside the outer shell. Fold the rough edges inwards twice... then iron. I only folded ONCE... As you'll see in the picture below it leaves an unsightly mess to do it my way so I suggest folding twice. Sew using an 1/4'' to 1/2'' seam allowance depending on how much you folded inwards.
| Inside few of mitten. |
Subscribe to:
Posts (Atom)